
Here is a new egg that I finally finished in time for Easter 2018. It sat around for about a year after I started it! (And yes, this is also my first post in three years! Hope I can get back on track with posting - AND with actually tatting.)
Here are three views of the egg:
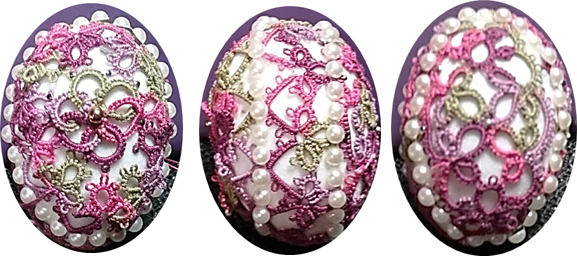 |
| FRONT SIDE BACK |
Below is the egg in its holder, showing its truer color, in Lizbeth Vintage Harvest #20. On the right, of course, is the side view in the holder, showing the two strands of adhesive pearls used to ‘section’ off the egg. The pearls were added last, of course.

This egg looks more complicated than it actually is.
There are only three ‘sections’ to it:
- a clover leaf band, lengthwise around the egg
(made up of two strips of clovers/chains,
connected by the picots on the chains) ,
- a large oval motif,
- a set of interlocking rings.
The band and motifs are attached to a styrofoam egg (with a smooth surface) using tiny-headed pins. I dd not attempt to tat the sections to each other.
As mentioned above, this egg has been ‘sitting around for long periods of time, but the total time I worked on it might have been only about five hours! Initially, I just couldn’t figure out how to proceed with it after I completed the first part - the band.
There are nine clovers on each side of the band. Although they were supposed to remain in the center of the egg, they didn’t end up that way!
If you study the area between the pearls, only one set of the two clover strips is visible. That’s because the one set of clovers/chains ended up being pulled way over toward the front of the egg - the interlocking rings section , and it now ‘frames’ the interlocking rings. (The clovers slightly overlap a bit (and are pinned down), but they look fine.)
The initial idea I had was that the clover band would symmetrically covered the egg lengthwise in the center. All I had to do was tat two oval motifs for the ‘front’ and ‘back’ sections . But I put the egg aside for quite a while and forgot about it. .
When I finally got back to it, my first attempt at an oval (using the clover theme again) happened to be just a bit too large, and I’m still not sure how I rounded the ‘bends’ on the narrower sides. (There seems to be some fudging there, but I don’t want to unpin it to find out!)
I pinned the oval onto the egg to see how I might redo it, and ‘attached’ it with pins to the one side of the band. It turned out that when I pulled on the other side of the band to pin it down (like in blocking), the clovers went way over to the front side of the egg, and now that area was smaller but was a more circular shape! I decided not to redesign the oval!
Now I had to think of a circular shape. So the project was abandoned again. Then one day recently, I was looking through my many ‘samples’ of tatting, and I finally found the perfect ‘filler’ for the open area - a motif of interlocking rings conveniently already tatted in Vintage Harvest, which I did a long time ago.
I was delighted with the way the interlocking rings fit right into that space! I now consider the side with the interlocking rings to be the ‘front side’.
Adding the pearl adhesive strips proved to be a nice finishing touch. Otherwise the egg looked like a mishmash of tatting, which was OK, but it looks so much better with the pearls dividing the sections.
INTERNATIONAL TATTING DAY; MAPLE SYRUP FESTIVAL
April 1 always falls around the time of our tatting event at the Maple Syrup Festival in Beaver County, but this year the festival is April 7-8 - a little later than usual. I had hoped the weather would be warmer due to the later date, but the forecast isn’t looking great. However, it will be dry, which is also important. Like much of the North East, we have experienced much colder weather than we would like - especially when we had 8” of snow on the first day of Spring last Wednesday!
* * * *


